webかたつむり ウェブデザインを勉強中 ウェブ初心者のおぼえがき

webかたつむり

WEB制作会社のフォトグラファー

photoshop shortcut

photoshopのアクションを使うときに、特定のレイヤーを指定しないで一連のフローを実行させるのに必要なショートカットを2つ。

  1. [Shift] + [Ctrl] + [Alt] + [N]
    レイヤーを新規作成(ダイアログボックス無し)。
  2. [Shift] + [Ctrl] + [Alt] + [E]
    背景を含む全てを統合したレイヤーをコピー。


1+2の操作を加えると、いままでに実行した処理をすべて施した、すべてのレイヤーを統合した、1枚のレイヤーができる。

このレイヤーに対してハイパスなどの処理を行うといちいち特定のレイヤーを指定しなくて済む。


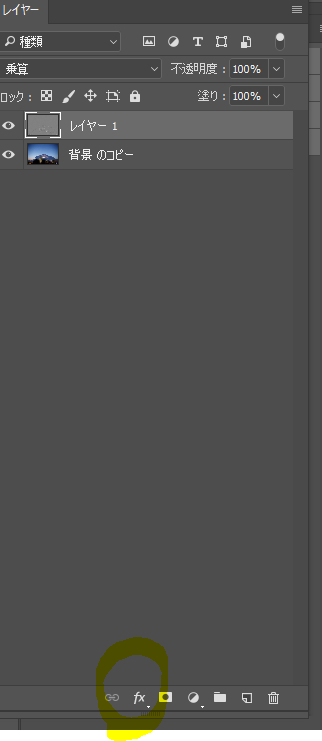
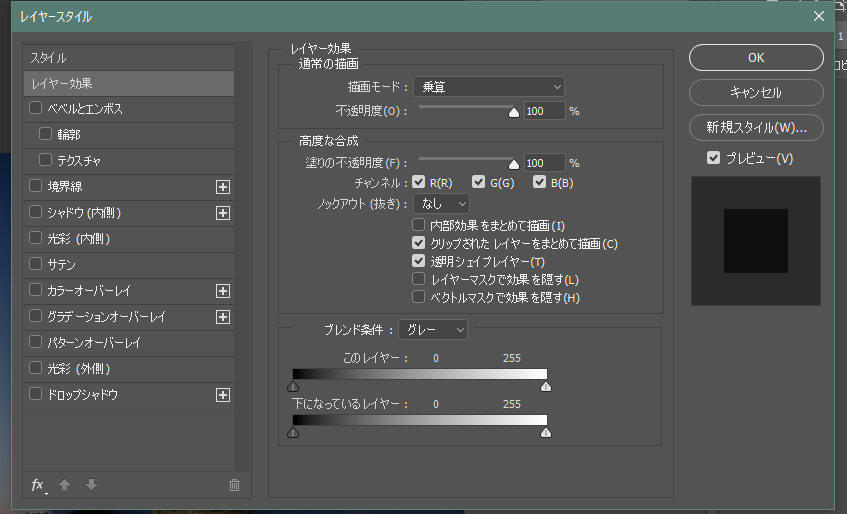
さらに、アクションを使うときは、レイヤー操作のダイアログボックスを使用する。

f:id:ohta-felica:20170518233231p:plain


f:id:ohta-felica:20170518233308p:plain


ここでプレビューを確認しながら決定すると、アクションがシンプルになる。

さらに、オリジナルのダイアログボックスを作ることができる。

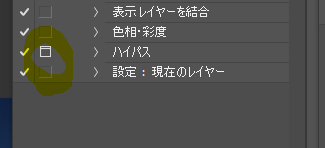
まず、下のようにダイアログボックスを作るアイコンをクリックする。

f:id:ohta-felica:20170518233438p:plain


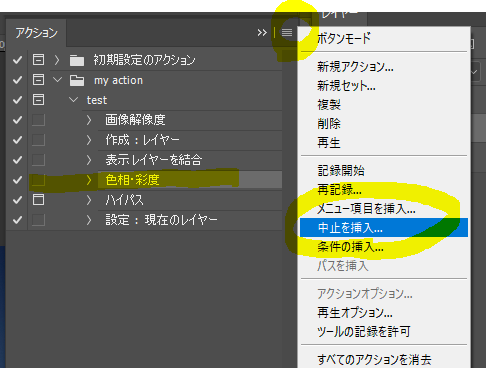
次に一段階前のアクションに「中止を挿入」

f:id:ohta-felica:20170518233716p:plain

 ダイアログボックスに表示するメッセージを自分で入力します。

「続行許可」にチェック。


f:id:ohta-felica:20170518233844p:plain

 テストしてみます。

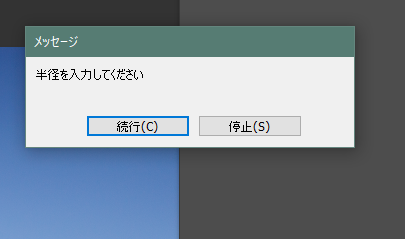
まずハイパスの手前で、ダイアログボックスが出てきます。

f:id:ohta-felica:20170518234031p:plain


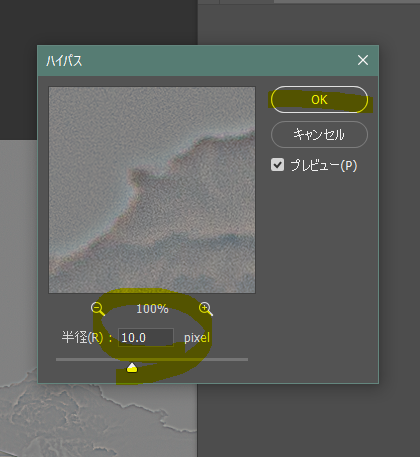
続行をクリックすると、半径を入力することができます。


f:id:ohta-felica:20170518234106p:plain


参考資料

ショートカットは、コマンド別にしています。
※Win XP+Photoshop CS2でのコマンドです。
Macの場合は、下記置き換えてください。
Ctrl = Cmd
Alt = Opt
右クリック = Control + クリック
1. F7
レイヤーパレットの表示・非表示の切り替え。
2. [Shift] + [Ctrl] + [N]
レイヤーを新規作成。
3. [Shift] + [Ctrl] + [Alt] + [N]
レイヤーを新規作成(ダイアログボックス無し)。
4. [Ctrl] + 「新規レイヤーを作成」ボタン
選択したレイヤーの下にレイヤーを新規作成。
※背景には適用されません。
5. レイヤーを選択して、[Ctrl] + [J]
選択したレイヤーをコピーして、新規作成。
6. [Ctrl] + [Alt] + [J]
選択したレイヤーをコピーして、新規作成(ダイアログボックス有り)。
7. [Shift] + [Ctrl] + [J]
選択したレイヤーの選択範囲をカットして、新規作成。
8. [Ctrl] + [Alt] + [A]
背景以外の全てのレイヤーを選択。
9. 任意のレイヤーで右クリックして、「同じ種類のレイヤーを選択」
背景以外の全ての同じ種類のレイヤーを選択。
10. [Ctrl] + [
選択したレイヤーを下に移動。
11. [Ctrl] +
]
選択したレイヤーを上に選択。
12. [Shift] + [Ctrl] + [
選択したレイヤーを一番下に移動。
13. [Shift] + [Ctrl] +
]
選択したレイヤーを一番上に選択。
14. [Alt] + [
レイヤーの選択を下方向に移動。
15. [Alt] +
]
レイヤーの選択を上方向に移動。
2017/5/18 Photoshopで、レイヤーを操作する便利な33のショートカット | コリス
http://coliss.com/articles/buildwebsites/
operation/design/785.html 2/2
16. [Shift] + [Alt] + [
レイヤーの選択範囲を下方向に増やす。
17. [Shift] + [Alt] +
]
レイヤーの選択範囲を上方向に増やす。
18. 「目(レイヤーの表示/非表示)」をクリック
クリックしたレイヤーの表示・非表示の切り替え。
19. 「目(レイヤーの表示/非表示)」を[Alt] + クリック
クリックしたレイヤー以外の表示・非表示の切り替え。
20. 「目(レイヤーの表示/非表示)」を[Alt] + クリックした後、[[ or ]]
表示レイヤーの下or上に移動。
21. [Ctrl] + [A]
選択したレイヤーの中身の全てを選択。
22. レイヤーサムネイルを、[Ctrl] + クリック
選択したレイヤーの中身だけを選択。
23. [Ctrl] + [Alt] + [A]
背景以外の全てのレイヤーを選択。
24. [Ctrl] + [G]
選択したレイヤーに、レイヤーグループを新規作成。
25. [Shift] + [Ctrl] + [G]
選択したレイヤーグループを削除。
26. [Ctrl] + [E]
選択したレイヤーを下のレイヤーと統合。
27. [Ctrl] + [E]
選択した複数のレイヤー全てを統合。
28. [Ctrl] + [Alt] + [E]
選択したレイヤー全てを統合したレイヤーをコピー。
29. [Shift] + [Ctrl] + [E]
背景を含む全てのレイヤーを統合。
30. [Shift] + [Ctrl] + [Alt] + [E]
背景を含む全てを統合したレイヤーをコピー。
31. [Ctrl] + [G]
選択したレイヤーのクリッピングマスクを作成・解除。
32. [Shift] + [+ or ‒]
選択したレイヤーのブレンドモードを上・下から順番に変更。
33. [V]の後に、[数字キー]
選択したレイヤーの不透明度の変更。
※数字キーのみで可の場合もあります


stock photo

いまや写真は拾ってくるもの、、、ゴミか???

というわけでどれだけ良い写真を、ただで拾ってくるかも腕なのか?


unsplash.com

https://stock.adobe.com/jp/

www.shutterstock.com


☟一日ひとつは無料でいただけるので、コツコツストックしましょう。

www.ac-illust.com

font を加工する

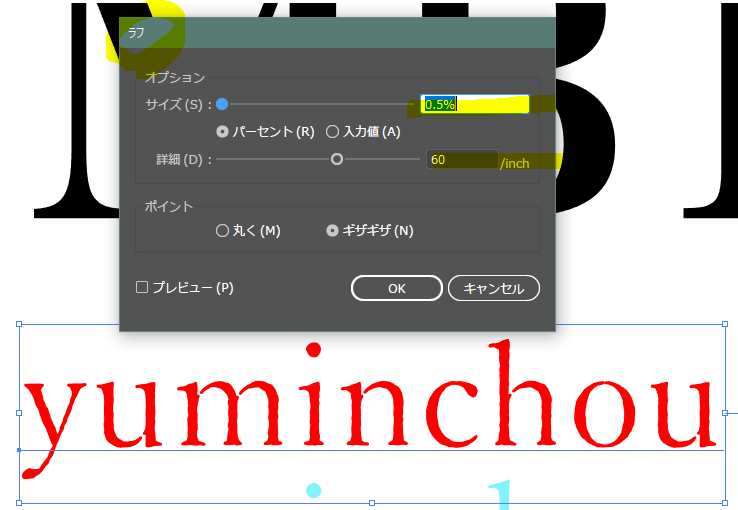
illustratorアピアランス」でフォントを加工する。


最初は、エッジをギザギザにする。

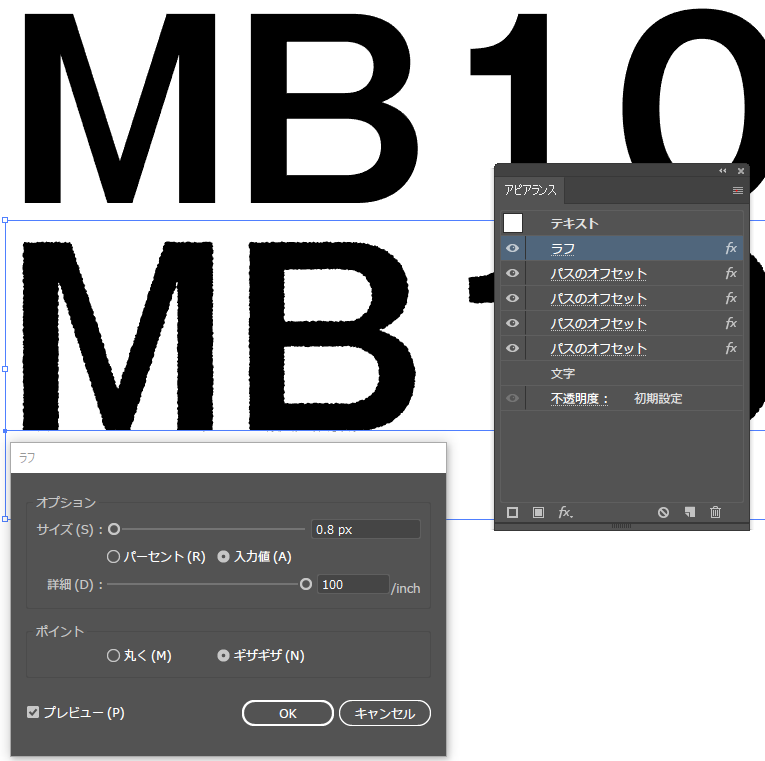
「パス」「パスの変形」「ラフ」を使用する。

パラメータの値を変えて、2度ラフをかけると、より複雑な味わいになる。

フォントの種類によって効果が変わってくる。

f:id:ohta-felica:20170407224946p:plain


 次は線の太さ(相似形にはならない)を変えてみます。

今回は「パス」「パスのオフセット」を使用します。

f:id:ohta-felica:20170407231214p:plain

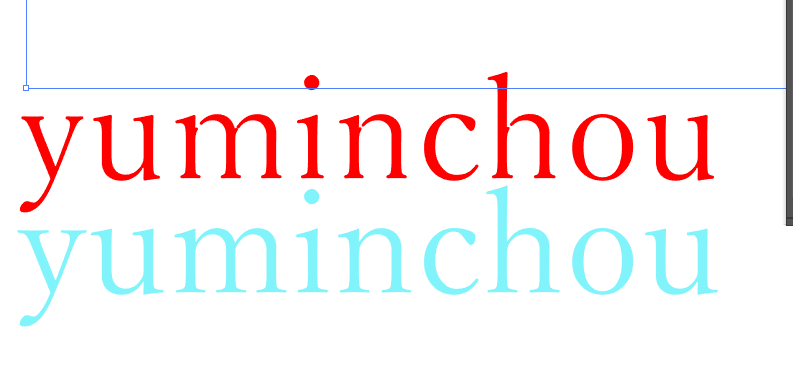
シアン(下)「パスのオフセット」「+0.1」「-0.25」

レッド(上)「パスのオフセット」「+0.5」「-0.5」「+0.1」「-0.25」

重ねてみると、、、

f:id:ohta-felica:20170407231512p:plain

 こんな感じです。最初に同じ値だけ「+」してから「ー」すると結果が微妙に変わります。特に水平方向。

「レッド」に「ラフ」を追加してみる。

f:id:ohta-felica:20170407231825p:plain


 ガリ版刷り風、、、邪道ですか???


元ネタです。参考になりました。

日本語フォントの角を丸くしてイメージを変えてみる | 鈴木メモ

photoshop 不要な透明部分を削除する方法


ポラロイド写真をスキャンして、フレームだけを利用する。

このとき外側の透明部分が必要ないので削除したい。


f:id:ohta-felica:20170305103629j:plain


「ctrl」+「サムネール」でフレームだけを選択する。


f:id:ohta-felica:20170305103906j:plain


「イメージ」「切り抜き」


f:id:ohta-felica:20170305104004j:plain


これで切り抜けます。


f:id:ohta-felica:20170305103629j:plain


wacom for photoshop

photoshop用にwacomを設定する

wacomには説明書がないから不便、、、

youtubeにあるチュートリアルを参考にペン、面倒。

Five Photoshop Tips for Wacom Tablet Beginners - YouTube


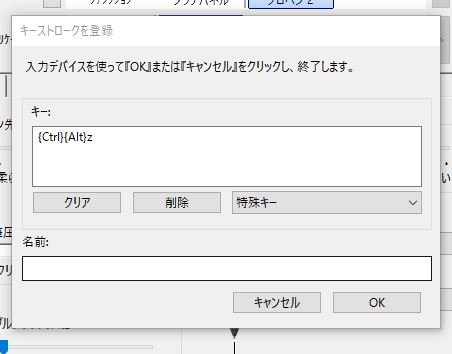
ペンのupperbuttonに「一つ戻る」、lowerbuttonに「右クリック」を設定する。


f:id:ohta-felica:20170304072844p:plain


f:id:ohta-felica:20170304073333j:plain


複数のカスタマイズしたgooglemapsを配置する(ここでは6つ)

js/outline.jsの内容

// JavaScript Document

function initialize() {
var latlng_01 = new google.maps.LatLng(35.700122, 139.776031);
var myOptions_01 = {
zoom: 17,
center: latlng_01,
mapTypeId: google.maps.MapTypeId.ROADMAP
};
var map_01 = new google.maps.Map(document.getElementById("map_canvas_01"), myOptions_01);
var marker = new google.maps.Marker({
position: latlng_01,
map: map_01
});

var latlng_02 = new google.maps.LatLng(34.680533, 135.510132);
var myOptions_02 = {
zoom: 17,
center: latlng_02,
mapTypeId: google.maps.MapTypeId.ROADMAP
};
var map_02 = new google.maps.Map(document.getElementById("map_canvas_02"), myOptions_02);
var marker = new google.maps.Marker({
position: latlng_02,
map: map_02
});

var latlng_03 = new google.maps.LatLng(35.003861, 135.751226);
var myOptions_03 = {
zoom: 17,
center: latlng_03,
mapTypeId: google.maps.MapTypeId.ROADMAP
};
var map_03 = new google.maps.Map(document.getElementById("map_canvas_03"), myOptions_03);
var marker = new google.maps.Marker({
position: latlng_03,
map: map_03
});

var latlng_04 = new google.maps.LatLng(35.625393, 135.061006);
var myOptions_04 = {
zoom: 17,
center: latlng_04,
mapTypeId: google.maps.MapTypeId.ROADMAP
};
var map_04 = new google.maps.Map(document.getElementById("map_canvas_04"), myOptions_04);
var marker = new google.maps.Marker({
position: latlng_04,
map: map_04
});

var latlng_05 = new google.maps.LatLng(35.982359, 139.963494);
var myOptions_05 = {
zoom: 17,
center: latlng_05,
mapTypeId: google.maps.MapTypeId.ROADMAP
};
var map_05 = new google.maps.Map(document.getElementById("map_canvas_05"), myOptions_05);
var marker = new google.maps.Marker({
position: latlng_05,
map: map_05
});

var latlng_06 = new google.maps.LatLng(34.887385, 135.744679);
var myOptions_06 = {
zoom: 17,
center: latlng_06,
mapTypeId: google.maps.MapTypeId.ROADMAP
};
var map_06 = new google.maps.Map(document.getElementById("map_canvas_06"), myOptions_06);
var marker = new google.maps.Marker({
position: latlng_06,
map: map_06
});
}
initialize();

 html 地図をレイアウトする場所に記述する内容

<div id="map_canvas_01" class="googleMaps" style="width:700px;height:300px;"></div>

<div id="map_canvas_02" class="googleMaps" style="width:700px;height:300px;"></div>

<div id="map_canvas_03" class="googleMaps" style="width:700px;height:300px;"></div>

<div id="map_canvas_04" class="googleMaps" style="width:700px;height:300px;"></div>

<div id="map_canvas_05" class="googleMaps" style="width:700px;height:300px;"></div>

<div id="map_canvas_06" class="googleMaps" style="width:700px;height:300px;"></div>


bodyの閉じタグの前に記述

<!-- googlemaps API -->
<script type="text/javascript" src="http://maps.google.com/maps/api/js"></script>
<script src="js/outline.js"></script>


javascript 再帰関数 / ハノイの塔

ハノイの塔

scr=source

aux= auciliary 補助

dst=destination

ここから本題、、、


var hanoi = function (disc, src, aux, dst){

if (disck>0){

hanoi(disc -1 , src, dst, aux); →ここが1行目

document.write ('move disc' + disc + 'from' + src + 'to' +  dst ); →ここが2行目

hanoi (disc -1 , aux, src, dst); →ここが3行目

}

};


この処理のプロセスを追いかけてみる。

hanoi(3, 'SRC',' AUX',' DST');


まず1行目

hanoi(2, src, dst, aux);

    hanoi(1, src, aux, dst);

        hanoi(0, src, dst, aux);→disc = 0 だからここで終わり

        move disc 1 from src to dst

        hanoi(0, aux, src, dst);→disc = 0 だからここで終わり

    move disc 2 from src to aux

    hanoi(1, dst, src, aux);

        hanoi(0, dst, aux, src);→disc = 0 だからここで終わり

        move disc 1 from dst to aux

        hanoi(0, src, dst, aux);→disc = 0 だからここで終わり

そして2行目

move disc 3 from src to dst

最後に3行目

hanoi(2, aux, src, dst);

    hanoi(1, aux, dst, src);

        hanoi(0, aux, src, dst);→disc = 0 だからここで終わり

        move disc 1 from  aux to src

        hanoi(0, dst, aux, src);→disc = 0 だからここで終わり

    move disc 2 from aux to dst

    hanoi(1, src, aux, dst);

         hanoi(0, src, dst, aux);

        move disc 1 from src to dst

        hanoi(0, aux, src, dst);

WordPressでpathやURLを取得するためのタグと出力例まとめ( すぐにリンクするためのメモ)


pathはローカルの場合は「C:\xampp\htdocs\xampp\example/」。
サーバの場合は「/var/www/html/example/」といった感じになります。

関数解説出力
ABSPATH インストールされた場所のパス C:\xampp\htdocs\xampp\example/(ローカルの場合)
/var/www/html/example/(サーバの場合)
admin_url() 管理画面のパス http://www.example.com/wp-admin/
content_url() wp-contentディレクトリのパス http://www.example.com/wp-content
get_attachment_link( $id ) 添付ファイルのIDを渡すと添付ページの URI を返す http://www.example.com/?attachment_id=$id
get_author_posts_url( $author ) 投稿者別のアーカイブページへのリンク。投稿者名を入力する http://www.example.com/?author=0
get_bloginfo( $show ) デフォルトはnameでサイト名が返ってくる。変数による違いは以下の通り。 http://localhost/xampp/example
$show = ‘admin_email’ admin@example.com
$show = ‘atom_url’ http://www.example.com/home/feed/atom
$show = ‘charset’ UTF-8
$show = ‘comments_atom_url’ http://www.example.com/home/comments/feed/atom
$show = ‘comments_rss2_url’ http://www.example.com/home/comments/feed
$show = ‘description’ Just another WordPress blog
$show = ‘home’ http://www.example.com/home (DEPRECATED! use url option instead)
$show = ‘html_type’ text/html
$show = ‘language’ en-US
$show = ‘name’ Testpilot
$show = ‘pingback_url’ http://www.example.com/home/wp/xmlrpc.php
$show = ‘rdf_url’ http://www.example.com/home/feed/rdf
$show = ‘rss2_url’ http://www.example.com/home/feed
$show = ‘rss_url’ http://www.example.com/home/feed/rss
$show = ‘siteurl’ http://www.example.com/home (DEPRECATED! use url option instead)
$show = ‘stylesheet_directory’ http://www.example.com/home/wp/wp-content/themes/largo
$show = ‘stylesheet_url’ http://www.example.com/home/wp/wp-content/themes/largo/style.css
$show = ‘template_directory’ http://www.example.com/home/wp/wp-content/themes/largo
$show = ‘template_url’ http://www.example.com/home/wp/wp-content/themes/largo
$show = ‘text_direction’ ltr
$show = ‘url’ http://www.example.com/home
$show = ‘version’ 3.5
$show = ‘wpurl’ http://www.example.com/home/wp
get_category_link( $id ) カテゴリーアーカイブページヘのリンク http://www.example.com/?cat=0
get_day_link( $year, $month, $day ) 日別アーカイブページのリンク。デフォルトは現在の日。 http://www.example.com/?m=20150313
get_edit_user_link( $user_id ) ユーザー情報編集画面用のパス http://www.example.com/wp-admin/profile.php
get_feed_link() FeedのURLを取得 http://www.example.com/?feed=rss2
get_month_link( $year, $month ) 年別アーカイブページのリンク。デフォルトは現在の年度。 http://www.example.com/?m=201503
get_page_link( $id ) 固定ページのパーマリンクを取得 http://www.example.com/?page_id=$id
get_permalink( $id ) $idを入力するとURLのスラッグを返す。パーマリンク設定によって異なる http://www.example.com/?p=$id
get_post_type_archive_link( $posttype ) カスタム投稿タイプのアーカイブページを返す。get_post_type_archive_link( get_post_type() )など http://www.example.com/$posttype
get_stylesheet() 現在適用されているテーマ(スタイルシート)のディレクト twentyten-child
get_stylesheet_directory() 現在適用されているテーマ(スタイルシート)のディレクト /var/www/html/example/wp-content/themes/twentyten-child
get_stylesheet_directory_uri() 現在適用されているテーマをURI表記で返す http://www.example.com/wp-content/themes/twentyten-child
get_stylesheet_uri() 現在適用されているテーマ(スタイルシート)のパス /var/www/html/example/wp-content/themes/twentyten-child/style.css
get_tag_link( $id ) タグアーカイブページヘのリンク。IDで指定してスラッグで返ってくる。 http://www.example.com/?tag=wordpress
get_template_directory() 親テーマのディレクト /var/www/html/example/wp-content/themes/twentyten
get_template_directory_uri() 親テーマのURI http://www.example.com/wp-content/themes/twentyten
get_term_link( $id ) カスタム分類アーカイブページヘのリンク。タクソノミーが無いとWP_Error Objectを返す http://www.example.com/custom-taxonomy
get_theme_root() テーマのディレクト /var/www/html/example/wp-content/themes
get_theme_root_uri() 親テーマのディレクト http://www.example.com/wp-content/themes
get_year_link( $year ) 年別アーカイブページのリンク。デフォルトは現在の年度。 http://www.example.com/?m=2015
home_url( $path, $scheme ) $pathにはホームURLからの相対パス。$schemeはhttpかhttpsもしくはrelative(相対パス http://www.example.com/$path
includes_url() wp-includesのディレクトリを返す http://www.example.com/wp-includes/
plugin_dir_path( __FILE__ ) 現在のファイルのディレクトリを返す。pluginファイルに書けばプラグインのパスを返すが、必ずしもpluginのディレクトリを返すとは限らない /var/www/html/example/wp-content\themes\twentyten-child/
plugins_url() プラグインディレクトのパス http://www.example.com/wp-content/plugins
site_url() サイトのアドレスを表示。スラッシュは付かない http://localhost/xampp/example
the_permalink() 現在のページのパス http://www.example.com/
WP_CONTENT_DIR wp-contentディレクトリのパス /var/www/html/example/wp-content
wp_get_shortlink( $id ) 短縮URL、ショートリンクを表示する。パーマリンク設定で長いスラッグにしている場合に外部プログラムへ短いURLを渡したい場合などに使う http://www.example.com/?p=$id
WP_LANG_DIR languagesディレクトリのパス /var/www/html/example/wp-content/languages
wp_login_url() ログイン画面のパス http://www.example.com/wp-login.php
wp_logout_url() ログアウト用のパス http://www.example.com/wp-login.php?action=logout&_wpnonce=0000000000
wp_lostpassword_url() ログアウト用のパス http://www.example.com/wp-login.php?action=lostpassword
WP_PLUGIN_DIR プラグインディレクトのパス /var/www/html/example/wp-content/plugins
wp_registration_url() ユーザー登録用のパス http://www.example.com/wp-login.php?action=register
wp_upload_dir($time) アップロードディレクトリ URL。配列で返ってくる。$timeはデフォルトはnull。$time = ‘path‘ /var/www/html/example/wp-content/uploads
$time = ‘url‘ http://www.example.com/wp-content/uploads
$time = ‘subdir‘  
$time = ‘basedir‘ /var/www/html/example/wp-content/uploads
$time = ‘baseurl‘ http://www.example.com/wp-content/uploads
$time = ‘error‘ bool(false)


wordpress theme "asteria lite" を使ったカスタマイズ作業の段取り

画像やリンクのパスをどのように指定するのがよいのか?

1月15日に考えたこと、、、

functions.phpに関数を追加する

  • 以下のコードをfunctions.phpに追加する。
  • 絶対パスの、「ホスト名」部分を省略して記述する段取り。

function delete_host_from_attachment_url($url) {  $regex = '/^http(s)?:\/\/[^\/\s]+(.*)$/';  if (preg_match($regex, $url, $m)) {    $url = $m[2];  }  return $url;}add_filter('wp_get_attachment_url', 'delete_host_from_attachment_url');add_filter('attachment_link', 'delete_host_from_attachment_url');

1月22日にあらためて考えたこと

  • phpを使って、絶対パスを読み込む方法。
  • <img src="<?php echo content_url(); ?>/themes/asteria-lite/images/######.jpg" alt=""  class="alignnone size-full wp-image-921" />のような指定方法。
  • あるいは、「theme」「asteria-lite」「images」に画像ファイルを置いて、相対パスで指定するか。
  • phpを使って絶対パスでリンクを指定する方法だと、backgroundをurlで指定するときにうまくいかない。
  • backgroundを使うこともあるだろうから、とりあえずは「images」フォルダーに画像ファイルを入れておこうと思う。


固定ページのテンプレートを作る

  1. 「page-」+「ページ内容が分かる名前」+「.php」つまり、page-#####.php、というファイルを作る。
  2. このファイルを、「wordpress」「wp-content」「themes」「asteria-lite」の直下に置く。
  3. 必要なページ分あらかじめ作っておく。

固定ページ用テンプレートのソースコード

  1. 冒頭は、wordpressに固定ページのテンプレートであることを宣言する記述が必要になる。(1-5行目)
  2. このテーマ(asteria-lite)のphpファイルには必ず「<?php global $asteria;?>」と記述されているので、それに準じる。
  3. ヘッダーを読み込む。

<?php
/*
Template Name: ##### page
*/
?>

<?php global $asteria;?>
<?php get_header(); ?>


 ダッシュボードで入力できる部分を作る

  1. この場合以下のソースコードを、入力した内容が表示されたい個所に記述する。
  2. このソースは、asteria-liteにあらかじめ用意されている「page-fullwidth」テンプレートからコピーしてきた。

制約事項

  • ダッシュボードから追加できる箇所は、1ページにつき一か所となる。
  • クラス名の命名規則は共同で開発する場合には規定しておいた方がいい。